Showing posts with label DIY. Show all posts

Wednesday, November 20, 2013

Santa Sticks!


Christmas crafting has begun!  I am so excited to be working on Christmas crafts.  I will be honest and tell you that I start up with the Christmas stuff much earlier than I really should.  If you are one of those people who does not like the stores to put up decorations until after Thanksgiving, then you don't want to be involved with me.  I like to start early!

Which brings me to these Santa Sticks that I made, ahem, right after Halloween.  It has taken great restraint not to post them until now!


Do you remember these sticks from early in the year?  The Santa Sticks are my "holiday sticks"!  Ha Ha, who knew I would need seasonal sticks for my backyard.  Good thing trees always need to be pruned because my son's stick "collection" is dwindling very quickly!  Once I get the evergreen branches in the urn I think they will look a little more at home.  They are a little lonely right now!

These were so easy to make.  I just whittled the tops a little bit to look like Santa's hat, and I carved a little bark off for the face.  Then I painted them up to look like Santa.   For the face I just put two tiny black eyes, I'm not sure you can see that in the photos.  I had a hard time getting these bad photos, sorry.

Have you painted any sticks for your yard yet?

Tuesday, October 29, 2013

Driftwood Garland


I just LOVE driftwood!


The texture, the interesting shapes, but mostly, the colors.  My partner in crime  husband and I have gotten a little hooked on collecting driftwood.  We have been going to a nearby Lake Michigan beach and collecting tons driftwood.  We have a big idea for a Christmas project, so we think we need a lot of it. 

 But, I have been getting antsy to use some of it, so I took a bunch of small pieces and made this cute hanging garland, which now lives in our vestibule!


Cute, right?  I just drilled a small hole in each piece, then strung them up on wire.  Do you remember this project?  It's the same idea and it could not be any easier!

Would you ever collect driftwood for a project?  

Tuesday, October 15, 2013

Hand Print Season


I know it is not even Halloween yet, but do you know what is fast approaching?  Hand Print Season!!!  I love hand print season and I don't care that my son is 10 years old and probably won't want to do it this year, we are totally doing it!  I never get tired of them!!!


 I mean seriously, look at that cute turkey hand print!  My son painted the hand print and I did the finishing.  I love turning hand prints into things.  I must have gone temporarily insane on this one because I didn't do any lettering on the front.   


This one is from the year my son would only paint things if they were blue.  We still refer to it as his blue period, you know, like Picasso!  :)  But who am I to argue with his artistic vision, so we rocked that blue turkey like it was our job!!!  It is still one of my favorites!


PS.  Since I am firing that beast of a kiln up for those LaTasca pitchers anyway, I have room in the kiln to fire hand prints on plates again!

 Who's with me on this one?
  

Sunday, October 6, 2013

Hi and an Update!


How sad!  This poor little blog been neglected!  Lots and lots of things have actually been happening at Factory 506, but none of them have made it here yet.  So, how about a little update?


Apples have been picked...and eaten!


Signs have been painted at my son's school.


I decided that I needed to bring home several loads of beautiful rocks from Lake Michigan.


S'more sticks have been made, and used...many times!


S'more bars have been set up.


LOT'S of these have been eaten!


I have become obsessed with big feathers and have collected about 10 birds worth!


I have also become obsessed with driftwood and have brought home about three car loads full from Lake Michigan.


I stressed out and had to use more Rescue Spray than I would like to admit.


I made some yummy soup.


I got My SON got a Rainbow Loom and someone has become a fishtail expert!


Fall Happy Hours have been enjoyed.


I started painting an old jacket!


Yikes, I got myself back in business and will be painting sangria pitchers for a local tapas restaurant!  


I painted a bunch of stuff for Halloween, including this pumpkin that I will hang on my front door. 

And as you probably notice from the boarder on some of my photos, I have gotten a little too excited about Instagram!   

What have you been doing? 


Monday, September 23, 2013

Pompoms!


I'm back on the POMPOM train!!!  I don't know where the last week and half went, so don't even ask.  But here we are on Monday and the pompomery is rolling and I have just the cutest little pompom project that is perfect for fall.  Tiny acorn pompoms, yes, tiny acorn pompoms!!!

Mark and I went to an awesome park last week and found tons of acorns.  I knew I "needed" to bring a bunch of them home for projects, squirrel feeding, etc...  Luckily for me my husband understands (and accepts) my madness and he helped me gather a bunch of them.  *Side note:  I go for quantity and Mark goes for quality, finding perfect specimens while I just get as many in the bag as I can carry.  We are a perfect team!

After a bunch of the acorns became disconnected from their little caps, I decided that an acorn cap plus a pompom would equal total fall cuteness!  


I mean seriously, are these not just the cutest little acorns!?!  I love them and they are just the easiest to make.  You can make a pompom, which is what I did, but you could also just glue a pre-made pompom from the craft store onto the cap.  I made a tiny hole with a drill bit so that I can hang them from a piece of yarn.  But you don't need to do that if you just want to put them in a bowl.


Get going, go find some acorns, it is pompom acorn season!


Tuesday, September 3, 2013

PomPoms!


I LOVE POMPOMS!


It's true, I LOVE pompoms!  There, I said it, and now it is in writing, although I am sure this comes as NO surprise to anyone who knows me, or anyone who has seen me, or has stepped into my house!  In fact, during one marathon pompom making session here at Factory 506, my friend Shane named my patio table "The Pompomery"!  I love it, and the term has stuck.  

I have been making, finding and buying pompoms for more years than I can remember.   I may or may not have even gotten some of the neighborhood crafting wizards in on this affliction  hobby!   I most likely have a serious problem, but it is one of those harmless issues that keeps me happy.  Pompoms make me happy, very happy!  In fact, they make me so happy that I am declaring this week, POMPOM WEEK!!!


Let's begin with the latest batch from the Pompomery!


I love how my stick star looks all dressed in pompoms!  


It is super easy to make pompoms. You can make them by hand with just a bunch of yarn or you can buy a pompom maker, better yet, a set of pompom makers in all different sizes.  I make them by hand and with a pompom maker.  And they are all fabulous!

Through much careful research here at the pompomery, we have found that a pompom maker will give you a fatter and "meatier" pompom and making them by hand will give you a cute pompom that looks a little more like fireworks.  Same pompom shape, just not as fat.


The pompom on the left was made with the pompom maker and the one on the right was made by just wrapping yarn around my hand.  Obviously, both are awesome, just a little bit different.  I have a friend who makes her pompoms by using two circles cut out of cardboard.  What ever the method, it's very fast and easy to make pompoms.  And guess what?  There are about 10 million things that you can do with your pompoms.  Don't worry, we'll get into that later this week!

  Have you ever made a pompom?  If so, what did you do with them, I would love to know!
Should I give "How To" instructions tomorrow?

Monday, August 5, 2013

Cement Candle Holder


I seriously can NOT stop myself!  I am totally hooked on making things out of cement.  Look at the new candle holder I made.  It is just a larger container with three little openings for the candles.  I love it and it puts off a great amount of light!


Then I made a bunch more of these candle holders to give as teachers gifts this year.  So once I started thinking about the holidays...this happened!


I might need a cement intervention...

Friday, August 2, 2013

Rustic Candle Holder


Look at how cute my tree slice looks all styled up as a candle holder!


Do you remember when this happened?  This is a result of a storm like that one.  I asked the nice man with the chain saw to "slice" off a few pieces of a fallen tree for me before he tossed it all in the chipper.  I dried them out in the kiln and then sanded the "h-e-double hockey sticks out of them.  After they were thoroughly sanded, I used mineral oil on the tops, to seal them and prepare them for use.

 
 These slices are from a Linden Tree.  I just love how pronounced the growth rings are on them.  I have some maple slices from another storm waiting to be sanded and you can barely see the growth rings.  I am curious how they will look after they are sanded.  Don't worry, I will report back on that project!


The candles look really cute on the wood slice, but it seemed a little blah to me.  There is not enough contrast between the color of the candles and the color of the wood.


So I picked some herbs from the garden to add some interest and some color.  This is oregano in the front and I have parsley on the left and lemon balm on the right.  So pretty and so fragrant!


I also use these slices weekly to serve cheese and dried meat and salami!


Would you ever use a piece of a tree in your home?  If you are thinking about bugs, drying them in the kiln puts and end to any creatures.  RIP creatures!

Recycling Tags!


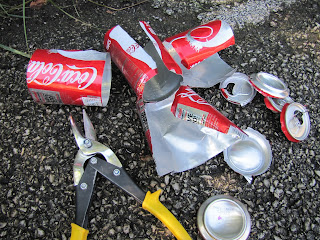
Look at the cute, but sharp, little tags that I made out of my empty Coke cans!


I wanted some little tags to put on some jars (more recycling) that I have been using as candle holders out on the patio.  But, I needed something that would stand up to the rain and elements, so I decided that the Coke can was the way to go.   


I even tied a few of them onto branches in the trees by the patio.  Cute right?


So here is how it all went down, if you are interested.
Drink all of your coke up and rinse the can, then cut the top and bottom off with tin snips.


All of these parts are sharp, like really sharp!  So do what I did and wear gloves, your hands will thank you!  After you get the tops and bottoms off, you will be able to cut the cans with a scissor.  Don't use your fancy sewing scissors, because I don't know what this will do to them.  I used my garden variety scissor that I have already messed up by cutting wire, Coke cans and all sorts of other things that they have no business cutting!

After all of the cutting you will end up with these nice rectangles of aluminum.


Now you just draw or trace your shapes and cut them out with the scissor!


They were cute enough like they were, but then I got my little metal stamps out and stamped some words and dates on them.


 I used a nail to punch a little hole on the top so that I could hang them up!


They are super cute, but again, they are very sharp, so don't put them where someone could get hurt.  

Have you ever made anything out of your recycled cans?

Thursday, July 25, 2013

It's sketchy!


I try to sketch or draw or doodle everyday.  It really does not take much effort because I love to draw, so I do it as much as possible.  It seems like whenever I am on the phone, making a list or just passing time, I am also sketching or doodling.  Most of the time, I really try to draw in my sketch book, but sometimes it is on my "to do" list, or the mail, or a napkin or a receipt...you get the idea.  

The only problem that I have with sketch books is this...


They are SO UGLY!  Seriously, is this the best you can do Strathmore???  I know there are plenty of cute plain paper notebooks out there, but the paper is usually so thin in those, and I like the size of this one.  But the green cover, no I just can not deal with that nonsense!  So I doll my sketch books up so that they are cute and functional for me.


I paint the covers and then I put a strip of packing tape on the inside of the cover, by the spiral thing that binds it together, to make the cover stronger.  I also tie a ribbon around it to keep the pages together.  I do a lot of my drawing with water colors, and it warps the pages, so if I didn't have the ribbon around it, it would puff up and be extra fat.  


  See how unruly they get?


The book on top only has a few pages painted, but you can see how much they warp.  I don't really care about that, but I do want it all to stay together when I shove it in my purse!

Are you a doodler? 

  Here is a fascinating article about doodling, if you are interested.