Showing posts with label candle holders. Show all posts

Monday, August 5, 2013

Cement Candle Holder


I seriously can NOT stop myself!  I am totally hooked on making things out of cement.  Look at the new candle holder I made.  It is just a larger container with three little openings for the candles.  I love it and it puts off a great amount of light!


Then I made a bunch more of these candle holders to give as teachers gifts this year.  So once I started thinking about the holidays...this happened!


I might need a cement intervention...

Friday, August 2, 2013

Rustic Candle Holder


Look at how cute my tree slice looks all styled up as a candle holder!


Do you remember when this happened?  This is a result of a storm like that one.  I asked the nice man with the chain saw to "slice" off a few pieces of a fallen tree for me before he tossed it all in the chipper.  I dried them out in the kiln and then sanded the "h-e-double hockey sticks out of them.  After they were thoroughly sanded, I used mineral oil on the tops, to seal them and prepare them for use.

 
 These slices are from a Linden Tree.  I just love how pronounced the growth rings are on them.  I have some maple slices from another storm waiting to be sanded and you can barely see the growth rings.  I am curious how they will look after they are sanded.  Don't worry, I will report back on that project!


The candles look really cute on the wood slice, but it seemed a little blah to me.  There is not enough contrast between the color of the candles and the color of the wood.


So I picked some herbs from the garden to add some interest and some color.  This is oregano in the front and I have parsley on the left and lemon balm on the right.  So pretty and so fragrant!


I also use these slices weekly to serve cheese and dried meat and salami!


Would you ever use a piece of a tree in your home?  If you are thinking about bugs, drying them in the kiln puts and end to any creatures.  RIP creatures!

Wednesday, July 24, 2013

We had a cement night!!!


I had the pleasure of working with my good friend Meg on an awesome Cement Project Night for some very talented ladies last night.  As I told Meg, I always assume most people are not into all of the crafty nonsense that I am borderline obsessed with LOVE so much.  She assured me that people would like it and they would have fun, and she hatched the plan.  Wine and cement!  It sounded like a success to me!

So last night, the nicest group of women ever, gathered to drink wine, make cement, and drink more wine!  It was so much fun.  Everyone got a little dirty, poured a little cement and made some very cool stuff!  Check out the fabulous projects now drying at Factory 506!!!


Letters, letters and more letters!


Tons of candle holders!


Cute flat shapes to put in the garden!


We are now all anxiously awaiting the 24 hour drying time so that we can take everything apart and admire our success!!!

Thank you Meg and everyone for such an AWESOME cement project night!!!  I can't wait for the next one.

More cement projects that we have done here, here and Meg's pieces here!


Wednesday, May 22, 2013

Cement Candle Holders

After seeing tons of cool cement projects on Pinterest, I decided it was time to hit up Lowes, buy a bag of cement and get going on my own!!!  I started with these adorable little candle holders.


I had been saving/hoarding the plastic containers from my favorite Sunburst tomatoes.  It has the cutest star shape, perfect for little candle holders to use out on the patio.  Although I would totally use these inside too.  


This is the cement that I used.  There were a ton of different kinds, who knew, and all of the packages sounded similar, so I just went for one that supposedly had a more "fine" appearance.  I have no idea what the sand/topping mix means.  But it worked for me!

I dumped some in a big bucket, added water and mixed it up with a stick.  I just kept adding water until it was kind of thick, but I could still scoop it out with a cup and pour it into my mold.  Like thick batter I guess, but I don't really deal with a lot of batter.

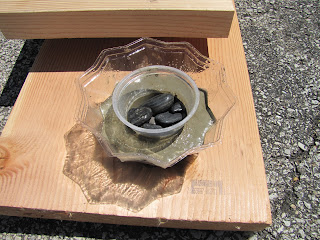
I sprayed my mold with cooking spray and sprayed the outside of that little cup that is on the inside too.  Then I just filled the tomato container with the cement mixture.  I put the little apple sauce cup inside (to make the spot for the candle) and when it kept floating to the top, I put some rocks in it to hold it down.  Make sure that you have it kind of straight.


The hard part is not bothering it for about 24 hours.  When it "looked" dry, I took the inside cup out, and the whole thing cracked.  Don't do that!  Then a couple of hours later I took another one out of the mold, and it cracked.  Don't do that either!  Just wait 24 hours so that you can pop them all out without any problems.  I ended up with six of them, after the cracking.  I filled some of the molds higher than others so I would have a little variation in size.  

I just love my first cement project.  I think they are as cute as can be, and they could not have been any easier to make.  Now I have a lot of other cement projects in mind.  Good thing since I probably have 49.5 pounds left in my 50 pound bag!!!  

Have you ever though of making things out of cement?  I am completely hooked.....